
Groin injuries
Groin injuries are injuries to any of the following five muscles - (the pectineus, adductor brevis and adductor longus (called short adductors which go from the pelvis to the thigh bone) and the gracilis and adductor magnus (long adductors which go from the pelvis to the knee).
In general:
Groin injuries are common in every sport and the level of pain will normally indicate how serious the injury is. A groin injury will result in muscle pain in the inner thigh or groin and can last for a short or significant amount of time. For a simple groin pull, it’s advisable to simply ice the injury and rest until you feel able to return to training.
More serious groin injuries like a tear will cause sharp and acute pains to the area and will often cause swelling or bruising. Groin tears often occur when an athlete changes direction quickly or stops very suddenly. Any athlete that experiences a groin tear should contact their doctor for an examination. Physiotherapy or even surgery might be required to fix the problem.
Returning to training following a groin tear requires patience and a gradual build up of performance. Rushing back can lead to further strains and longer setbacks.
To avoid groin injuries, athletes must stretch the abductor muscles and hip flexors prior to competing and gradually build up to top performance.
Groin Tears:
Of all the soft-tissue injuries the athlete can suffer, groin injuries are potentially the most debilitating and frustrating of all, especially in terms of time lost from competition and return to full competitive fitness. The co-existence of multiple pathologies is the most plausible explanation for this observed difficulty in management. It is common for athletes to shop around seeking different medical opinions for their ongoing groin pain, and to receive varying medical suggestions as to where the problem originates.
Type of injury
It is important to remember that groin problems often have more than one possible pathology existing. Groin injuries are notorious for ‘co-existing pathologies’.
The ‘big three’ when considering ongoing chronic groin pain are adductor tendinopathy, osteitis pubis and inguinal (sportsman’s) hernia. It is not uncommon to see two or even all three of these conditions co-existing at the same time. However, there still exists a myriad of other pathological conditions affecting the groin area.
It is beyond the scope of this article to discuss all the presenting signs and symptoms of all these differentials. That in itself takes up entire chapters in sports medicine textbooks, and if done well should take up whole textbooks. For those interested, review Peter Brukner and Karim Khan’s text Clinical Sports Medicine (McGraw-Hill Book Company). However, considering that the theme of this series is on muscle injuries, this article will limit its focus to tears/strains of the adductor muscles. Other pathologies will be mentioned in context of management difficulties with adductor muscle strains.
Relevant anatomy
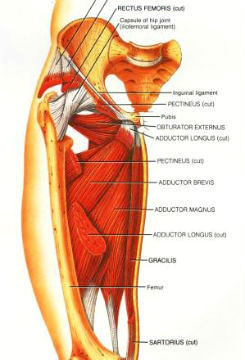
The adductor muscle group consists of the adductor longus/brevis/magnus, pectineus and gracilis. Of these, the adductor longus is the most superficial and easiest to palpate. Along with the gracilis, it is also the most easily injured. An interesting feature of the origin of the adductor longus is that it has fibres that arise from the pubic rami bilaterally and above and below the symphysis pubis. This may be one possible explanation of the migratory and sometimes bilateral nature of the symptoms with adductor longus pathologies.
In relation to the groin area, one must appreciate that within a hand’s breadth space, there exist a number of important anatomical structures that may present as a pathological entity. Above the pubic ramus (suprapubic groin pain) we have the conjoined tendon and its close cousin the inguinal canal. It is in and around the inguinal canal where inguinal hernias develop. Other rarer forms of hernias are umbilical hernias and Sprengel’s hernias. Around this area we also have the abdominal insertions (rectus is of prime importance) and more intimately associated with the pubic ramus is the pubic symphysis. Deep in the suprapubic area we also have the psoas muscle and high lumbar segmental nerves such as the ilioinguinal nerve and iliohypogastric nerve.
Below the pubic ramus (infrapubic groin pain) we have all the adductors and their respective tendons. The other dominant structure is the obturator nerve which has received a degree of recent interest, especially from the medical people at the Olympic Park Sports Medicine Centre in Melbourne, Australia.
Injury mechanisms
Adductor muscles are more commonly strained in sports involving twisting, turning, stepping and kicking, such as all codes of football. They are less commonly injured in straight-line sprinting, with acceleration being the dominant mechanism of injury with this sort of running. Similarly with hamstring injuries, adductor muscle injuries come about because of excessively strong contraction or excessive stretch.
I mentioned before in my articles on hamstring injuries that one school of thought suggests that a muscle must have pre-existing increased tone in order to tear/strain. This rationale maintains that an increase in tone due to some sort of altered afferent input brings a normally healthy muscle closer to its tensile breaking point. Any excessive stretch or contraction may possibly cause the muscle to tear. This reasoning gains some weight in support when one considers how often a pre-existing pathology such as osteitis pubis or an inguinal hernia is soon followed by an adductor muscle tear or vice versa.
Another interesting consideration is the neurology of the ilioinguinal nerve. It is novel to suggest that irritation of the ilioinguinal nerve (which innervates the motor component of the transversus abdominus and lower abdominals, and sensory component of the groin area) may in fact be a precursor to the general groin syndromes we know as adductor tendinopathy/osteitis pubis/inguinal hernia. Repetitive sprinting, turning and kicking may excessively load and stretch the psoas and abdominal muscles. This may generate an interface problem with the ilioinguinal nerve so that irritation of the nerve develops and, as a cause and effect consequence, the groin becomes irritated and poor muscle control leads to weakening of the abdominal wall, poor stability of the symphysis pubis and altered adductor-abdominal synergy during ballistic movement. As a result, breakdown of the groin area ensues. This may then be a plausible explanation as to why pathologies very often co-exist with ongoing groin pain. If any reader has the time or inclination to research such a topic it would make for some ground-breaking and innovative material.
Presentation and diagnosis
History
An athlete presenting with an adductor strain/tear will usually remember a definite episode leading to the injury, whether caused by sprinting, turning, stepping or kicking. Usually immediate pain is felt in the adductor attachment or in the two to three centimetres below the attachment. The athlete will demonstrate some degree of functional difficulty, whether it be inability to sprint or kick, and even walking may be hindered.
Often the adductor episode is preceded by abdominal or groin pain in the weeks leading up to the injury. For example, a posterior abdominal wall weakness may cause initial pain in the lower abdominal and/or referred into the groin. As mentioned above, due to possible reflex pathways the abdominal pain may then cause spasm and increased tone in the adductor group, leading to tightness and subsequent tearing.
Strength testing
The best way to test strength and inhibition of the adductor muscles is through the ‘Adductor Squeeze’ test. This is done with the patient lying on the table with the legs extended. The examiner places two clenched fists together between the patient’s knees and the patient then squeezes the knees onto the examiner’s fists. With acute injuries, it is advisable that the patient is instructed to slowly build pressure until maximum pressure is achieved. Pain and inhibition are then subjectively assessed. The same test is then done with the feet up on the table and the knees bent to 45 degrees. The third and final position is feet off bench with hips at 90 degrees. It is necessary to test all three positions, as acute tears may actually be pain-free in one of these testing positions.
The purpose of these tests is to qualify pain and inhibition at all testing positions and to gain some ‘asterix’ points for re-assessment in the near future.
Palpation
It is important to gain an impression of where the majority of tenderness exists. When felt the adductor tubercle is in most healthy people usually tender. Do not confuse tenderness in this point as direct evidence of the source of the pain. Compare sides and qualify that the pain and tenderness correlates with the pain felt on functional movements and adductor squeezes. Carry on and palpate the entire proximal muscle bellies (longus, brevis, magnus, gracilis, pectineus) for areas of tenderness, accumulated swelling, obvious defects or soft tissue induration. Continue down the entire muscle feeling for reactive spasm and trigger points. Finally, don’t forget to turn the patient over and palpate the posterior fibres of the adductor magnus.
Associated joints
The hip joint, lumbar spine and sacroiliac joints (SIJ) are all related via the kinematic chain to the groin area.
Hip joint
Assessing hip joint internal rotation is probably the most important and significant rotation direction to feel in relation to adductor problems, measuring internal rotation in both 90 degrees flexion and prone lying hip neutral. Rotation at 90 degrees is the more important range to gauge when dealing with adductor problems.
Decreased internal rotation is a common finding in athletes with osteitis pubis, inguinal hernias and lumbar spine pathologies. Lack of internal rotation may lead to a compensatory increase in hip abduction with stepping and cutting manoeuvres. This may then lead to excessive force being placed on to the adductor muscles and an injury may result.
Lumbar spine
Lumbar spine mechanics may have a complex and important role in the development of adductor-muscle problems. Lack of intersegmental lumbar extension will lead to a compensatory increase in hip extension, external rotation and pelvic rotation during the terminal stance phase of gait. This may lead to extra stress being directed at the hip flexors and adductors while sprinting and kicking. This coupled with poor lower abdominal control of the pelvic girdle may then lead to poor force transfer from the thigh, across the pelvis and into the trunk. Lumbar spine rotation is also implicated in the kinematic chain patho-mechanics of the hip joint and adductor region. A lack of low lumbar rotation may lead to an obligatory increase in hip joint rotation while changing directions. This coupled with a relatively restricted hip joint may then predispose the groin area to excessive force accumulation and subsequent tearing.
It is interesting to note how often athletes complain of a tight and restricted lumbar spine (usually unilateral and usually left-sided) in the few days preceding an adductor muscle tear. This is purely an observed clinical finding and has no empirical evidence based backing. One could rationalise that a tight and restricted lower lumbar spine may then cause a relative increase in hip joint movement that places more force on the unprepared adductor muscles. It is also interesting that clinical observation suggests that most of this occurs on the left side. It is a common finding, as I’ve said before in SIB, that the most common pelvic pattern is to have a hypertonic right TFL and psoas and a hypertonic left gluteus medius and gracilis. This is not to suggest that the majority of adductor tears are left-sided. However, in my experience, the balance is certainly not 50-50 left and right. Left sided tears do seem to predominate. However one must appreciate that this is most likely very dependent on the sport involved.
Sacroiliac joint
For the same reasons mentioned above, a restricted SIJ may cause a compensatory increase in motion required at the hip joint and adductor region. Exponents from the osteopathic school of thought will highlight how often a tight and restricted SIJ glide (as measured subjectively on a SQUISH test) will precede an adductor muscle tear on the opposite side. That is, a restricted right SQUISH may be associated and precede a left-sided adductor tear. Again, the complex interplay of all the joints making up the kinematic chain must be addressed.
Abdominal control
Controlling movement of the lumbar spine and pelvis is an essential component in providing a solid base from which the thigh muscles can function. Good activation and patterning of the deep stabilising muscles and the superficial ‘core’ muscles will reduce stress on the spine and minimise unwanted transfer of stress to the thigh muscles.
It is interesting to note that the Australian Rules Football Medical Committee is currently undertaking a large cohort study on the role Transversus Abdominus (TrA) has in the development of osteitis pubis. The biomechanical rationale is that poor TrA function leads to poor closure of the symphysis pubis during movement and thus the symphysis is subject to more shear force and subsequent breakdown. The role this has on the development of groin tears is more difficult to deduce.
Groin injuries treatment exercises and rehabilitation
Immediate management
Immediate icing of direct muscle tears of the groin and especially adductor attachment tears is beneficial and necessary in the 24-hour period after the injury. Unlike hamstring injuries, however, movement while icing is not necessary and may in fact be detrimental to the turn-around time of adductor injuries. This will be expanded further in the section on stretching.
Medical interventions
The reader is referred to issue 26 of SIB, page 6, regarding the dangers of over-zealous use of non-steroidal anti-inflammatories in muscle injuries.
Soft-tissue therapy
Any therapy that reduces muscle tone in the adductor muscles will be a useful adjunct in the treatment of this injury. This may be any soft-tissue massage (ischaemic pressure and longitudinal flush) in the area below the tear or 'trigger point' injection therapy into the adductor muscle belly.
Groin straps
It is common practice in Australia (particularly the Rugby League haven of New South Wales) to use groin straps in the management of adductor lesions. However, they are almost unheard of in the United Kingdom (this author needs to import them from Australia).
The rationale behind the adductor (groin) strap is similar to the Chopart or patella tendon strap. The application of the strap directs force on to the strap and away from the injured tissue. In relation to the adductors, the strap is usually applied high up around the thigh as close to the adductor tubercle as possible. It is placed on quite tight to be supportive but not occlusive to the femoral artery, vein and nerves. This then takes stress away from the adductor tubercle. It will result in an immediate decrease (not abolition) in pain on functional movement and adductor squeeze testing.
The athlete is instructed to keep the strap in situ 24/7, except for showering and sleeping (however, there is no reason why it needs to be removed during sleep). The athlete can continue to wear the strap during rehabilitation and return to sport.
Stretching
For some bizarre reason, the adductor muscles (and TFL for that matter – this will be discussed in the next article in this series series, on quadriceps) are the only muscles that respond POORLY to stretching in the initial post-injury period. There is no plausible explanation for this phenomenon. One possible reason (and this reason does have its flaws) is that the adductor muscle does not operate through a large range of motion during the execution of most sporting manoeuvres. Therefore, stretching of the muscle into end-of-range positions in the initial period may in fact place the muscle in a position it is not used to and comfortable with. This may lead to an adverse tissue reaction that further adds to the stress of the muscle and results in further increases in muscle tone.
The alternative to stretching the adductor muscle group is to use 'isometric stretching'. This is done by squeezing a football, rugby ball or netball. The ball is placed between the knees in the three testing positions mentioned on page 11 of the last issue of SIB. The ball is then squeezed to the point of discomfort but not pain. The contraction is held for 10 seconds and the legs are then moved up to the next position, 45-degrees knee flexion. Again, this is held for 10 seconds and the legs are then lifted to the 90-degree hip flexion position and contraction repeated for 10 seconds. Back down to legs straight and start again. This can be done five times in each position.
Why it works
The theory behind isometric stretching of the adductors is as follows. As the muscle isometrically contracts against a stationary and non-deformable object (the ball), the muscle tissue will undergo a degree of shortening. As a consequence, the tendon attached proximally to the muscle will be required to elongate slightly to keep the entire muscle-tendon complex at the same length. The amount of stretch and elongation we are talking is tiny; however, it is enough to cause a slight elongation in the tendon and tenoperiosteal junction. No other muscle in and around the pelvis responds in the same way to this technique as the adductor muscles.
Another way to isometrically stretch is to have the therapist control the weight of the leg, which is in knee extension. The leg is then lifted into progressive degrees of hip flexion, abduction and internal or external rotation. The patient is then instructed to gently pull into the opposite direction (adduction, flexion and the other rotation). This is very similar to a PNF contract-relax stretch. The leg can then be lifted and placed into more progressive positions based on the feeling of movement blocks (a term those trained in 'muscle energy' will be familiar with). This can be continued into the extreme end-of-range positions of hip flexion, with moderate amounts of rotation and minimal range of abduction.
Strength retraining
Initial strength retraining may take the form of 'adductor squeezing' as described above. This can be started almost at day one. The act of performing the adductor squeeze thus serves two functions; isometric stretch and strength retraining. This can be progressed from supine lying positions to wall squat positions. The protocol is the same: aim for 10-second holds and attempt five repetitions in each position. As adductor squeeze and function improves, the following exercises may be added to strengthen the adductor muscle:
Theraband adductions (crook lying): lying supine with knees and hips bent to 45 degrees. Place theraband around knee and attach to leg of table. Let the leg fall out to position of abduction and contract back to knees together position. This can be progressed into greater range, greater speed and greater resistance.
Theraband adductions (standing): standing with theraband around heel, hold on to chair for support, allow band to pull leg into abduction, contract back to adduction. Perform with the foot in front of the stance leg and foot behind the stance leg. And very important, do both legs. The adductor needs to retrain its movement function as well as its stabilising function.
Lunging (around the clock): feet together, step out in front (12 o'clock) and take weight via a lunge action. Push back to start position. Step out to the side (3 or 9 o'clock position) and back, then step backwards (6 o'clock) and back. Again, do BOTH legs.
Lateral step ups: place a knee-height box or chair about three feet at your side. Step up on to the box sideways and down again. Again do both legs. Progress by increasing speed.
Swiss ball squats: on a Swiss ball, either stand (for the vertically challenged) or perform a partial squat. This is a great isometric-adductor strength exercise.
Weights: this is not the time or the place to discuss weight-training routines, but a few key principles regarding leg weights need to be laid down. First, perform and be happy with two-legged bilateral exercises before progressing to one-leg unilateral exercises. For example, do two-legged leg press before attempting one-legged leg press. Second, be careful with the progression of load and speed. Adductors tend to work exponentially harder as one approaches the one-repetition maximums. Respect this before progressing loads. Furthermore, ballistic movements such as power cleans and snatches tend to recruit more adductor activity. Exercises where the feet do not leave the floor are generally safer initially.
Functional strengthening: field activities such as side-stepping and cariocas.
Rehab running/training
This stage has similar progressions to the fitness testing mentioned below. In order to retrain the adductors for functional use, activities need to be presented in a logical and progressive order.
The stages can be progressed from one day to the next, or progressed within the same session depending on presentation of symptoms. The progressions are as follows:
Straight line running: distances can be progressed in pyramid fashion. That is, 10m, 20m, 30m, 40m and so on. Overall maximum distance will depend on the individual athlete's requirements (sport and position). Speed needs to be progressed sensibly and always on the basis of presenting symptoms (pain) and clinical signs (adductor squeeze and palpation). Aim to reach full top-end speed before reaching flat-out acceleration and deceleration.
Weave running: progressed as above but instead of in a straight line, the athlete runs curves.
Sideways shuttles: stand on a line. Side-step five times to the right and then sprint forward 10 metres. Rapidly stop and then side-step five times to the left. Sprint 10 metres again and repeat the process to the right. This can continue for as many 10-metre segments as desired.
Sprint and cut: sprint forward 20 metres and step rapidly to the left at a 45-degree angle. Walk back and repeat to the right.
Cone drills: place five cones out in a random order over a 10-x-10- metre square. The idea of this drill is for the athlete to sprint to one cone, rapidly stop and reach down to touch the cone, look up at the tester who points at another cone for the athlete to sprint towards. This continues for 20 seconds and can be repeated as many times as desired.
Functional skills: depending on the sport played, this would include (if relevant) kicking, scrums, tackling, jumping etc..
Fitness testing
Those involved with the management of groin injuries (physiotherapists, sports medicine physicians, orthopods and athletic trainers) all have their favourite ways of assessing fitness for competition. Outlined below is a very direct and accurate method of assessing the functional ability to perform in competition and avoid risk of re-injury following an adductor-muscle strain.
The premise of the following fitness testing protocol is that two criteria must be satisfied; first, that the athlete can perform the testing procedure pain-free and without functional limitation, and second, that the adductor muscle does not 'tone up' two to three hours following fitness testing. This is assessed by palpation of the muscle. It is common for athletes to able to complete such a fitness testing session, and then have all sorts of problems in the few hours following.
As far as timing goes, this type of testing can be done the day before competition or even on the morning of an afternoon competition. This is in contrast to hamstring muscle injuries that ideally should be fitness tested 48 hours prior to competition.
Procedure
Assess adductor squeeze (pain and weakness) at three testing positions and feel muscle tone to gain an initial baseline. These should feel good if you have progressed to fitness testing.
Ten minutes of general running and stretching
Straight line running: 5 x 40 metre run-throughs progressed from warm-up speed to full speed. The rate of acceleration is not important at this point; the focus is on reaching full speed before 40 metres. Walk return after each repetition.
Straight line acceleration: (over 20 metres): 1 x 20 metre flying start (jog in before flat-out acceleration); 1 x 20 metre upright start (off the mark); 1 x 20 metre 3-point stance start; 1 x 20 metre starting on stomach.
Weave running: 4 x 40m: running in a 5-10 metre channel, the athlete sprints whilst weaving between two parallel lines (the in- goal area of a Rugby pitch is ideal). This is a pure weave (similar to running around a curve) and no side-stepping is involved. For example, the athlete may be instructed to touch the right line and then left line twice each on the first run, three times on the second, and so on. By increasing the number of touches on each line, the angles involved in the weave will become more acute and more challenging for the groin muscles.
Cutting manoeuvres: sprint 20 metres straight line and cut (stepping off) 45 degrees to the left or right (at full speed) and continue to sprint for another 10 metres before decelerating. Complete two to the left and two to the right.
Cone drills: place five cones out in a random order over a 10-x-10-metre square. The idea of this drill is for the athlete to sprint to one cone, rapidly stop and reach down to touch the cone, look up at the tester who points at another cone for the athlete to sprint towards. This continues for 20 seconds. The athlete repeats this for a total of four repetitions with one-minutes rest between efforts.
The final two efforts are modified in the following way. Instead of bending down to touch the cones, the athlete falls to the ground on his/her front. Before the athlete gets back to their feet, the assessor places some pressure on the athletes back so that they need to fight their way back on to their feet before continuing. This continues for 20 seconds (in this time expect the athlete to hit the ground 3-4 times). As a word of caution, this is very fatiguing to do at full speed for a full 20 seconds (if you disagree, try it yourself). Therefore, if testing on the morning of a game the time period may need to be modified depending on the individual fitness characteristics of the athlete/player.
Kicking: if this is a common skill component encountered in the game. Start with short-distance kicking and progress to long kicking and kicking across the body and kicking on the run. Warm down and stretch for 10 minutes.
Re-assess adductor squeeze and muscle tone: immediately after warm down, then again 2-3 hours following fitness testing. It is important that the adductor muscle is not treated in this time period.
The above testing procedure will assess the ability to perform all physical components required for competition whether the sport is football, rugby, basketball or Australian Rules Football. The distances can be modified for court sports such as tennis, basketball and netball, and the need to assess the ability to spring off the ground is not essential for these sorts of sports.
As I mentioned earlier, the above test should be performed pain-free and without functional limitation. Examples of functional limitation would be the inability or reluctance to turn away from the injured side, holding back on the acceleration component and obvious limping (hopefully the assessor would be wise enough to not even bother fitness testing in this situation).
The re-assessment of muscle tone is also of critical importance. If muscle tone is to increase following such an intense and involved testing session, then it will do so within the first two to three hours following the testing. From a pathological perspective, an increase in muscle tone is an indication that the original source of pathology (whether it be muscle or tenoperiosteal junction) has been irritated and has 'driven' the tone in the involved muscle belly. This is an important indication that the muscle is subject to possible further damage (in the form of a strain) especially under fatigue. The increase in tone will be quite obvious when you palpate if you have been assessing tone on a regular basis during preceding treatment days.
* Groin/Pelvic Pathologies
* Adductor muscle tears (Grade 1-3) (Add Brevis, Add Longus, Gracilis)
* Adductor Tendonitis/
* Tenoperiostitis
* Osteitis Pubis (Pubic Symphysitis)
* Inguinal/Sportsman's Hernia
* Posterior wall insufficiency
* Conjoined tendon tear
* Ilioinguinal nerve irritation
* Iliopsoas strain/bursitis
* Stress fracture (pubic ramus)
* Referred pain (lumbar spine and sacroiliac joint)
* Obturator nerve neuropathy
* Sinister pathologies such as prostatitis, UTIs, testicular tumour, infection.
See also:
»Newer topics:
»Older topics:
»
![]() Inflammation of the iliopsoas muscle
Inflammation of the iliopsoas muscle
The term iliopsoas refers to the combination of the psoas major and the iliacus at their inferior ends
![]() Inflammation of the iliopsoas muscle
Inflammation of the iliopsoas muscle
The term iliopsoas refers to the combination of the psoas major and the iliacus at their inferior ends
See also:
»Newer topics:
»Older topics:
»
![]() Groin strain causes
Groin strain causes
What to do if you are an unlucky sufferer from groin strains, and what action you can take to avoid them
![]() Groin strain causes
Groin strain causes
What to do if you are an unlucky sufferer from groin strains, and what action you can take to avoid them
See also:
»Newer topics:
»Older topics:
»
![]() Adductor - Groin Strain
Adductor - Groin Strain
Straining the pectineus, adductor brevis, adductor longus the gracilis and adductor magnus.
![]() Adductor - Groin Strain
Adductor - Groin Strain
Straining the pectineus, adductor brevis, adductor longus the gracilis and adductor magnus.

